1/4 scale Sea Fury

Why not share your information on your latest creation
Phil Clark
Posts: 941
Joined: December 4th, 2008, 7:07 pm
Location: Chester-le-Street, Co Durham
Contact:

Re: 1/4 scale Sea Fury

Postby Phil Clark » April 25th, 2015, 8:55 pm

Coming together nicely Dave.....looks good

P

Dave Jones
Posts: 116
Joined: December 4th, 2008, 8:31 pm
Contact:

Re: 1/4 scale Sea Fury

Postby Dave Jones » April 26th, 2015, 9:38 am

Looking good David! Btw what glue did you use to fix the sheeting on? Thick/slow cyno?

Dave.

Alan Cantwell 1131
Posts: 1655
Joined: June 15th, 2009, 8:21 pm
Contact:

Re: 1/4 scale Sea Fury

Postby Alan Cantwell 1131 » April 26th, 2015, 10:25 am

Jonesys down at Catton at the moment, be back tonight, might ring him later, see how they are getting on, if i do, i will ask him for you

Alan Cantwell 1131
Posts: 1655
Joined: June 15th, 2009, 8:21 pm
Contact:

Re: 1/4 scale Sea Fury

Postby Alan Cantwell 1131 » April 26th, 2015, 11:15 am

image.jpg
image.jpg (14.75 KiB) Viewed 10460 times

Alan Cantwell 1131
Posts: 1655
Joined: June 15th, 2009, 8:21 pm
Contact:

Re: 1/4 scale Sea Fury

Postby Alan Cantwell 1131 » April 26th, 2015, 11:17 am

Just talked to the man, lads are having a great time at Catton,this is the glue he uses, i think he buys it by the box off ebay, ive used it, good adhesion,

Dave Jones
Posts: 116
Joined: December 4th, 2008, 8:31 pm
Contact:

Re: 1/4 scale Sea Fury

Postby Dave Jones » April 26th, 2015, 4:17 pm

Thanks Alan, I will get hold of some and give it a try, looks like the colour of Aliphatic glue, thanks for your help,

Dave.

Alan Cantwell 1131
Posts: 1655
Joined: June 15th, 2009, 8:21 pm
Contact:

Re: 1/4 scale Sea Fury

Postby Alan Cantwell 1131 » April 26th, 2015, 5:15 pm

It is indeed aliphatic

David Jones
Posts: 413
Joined: January 24th, 2010, 8:21 pm
Location: Rossendale Lancs
Contact:

Re: 1/4 scale Sea Fury

Postby David Jones » May 18th, 2015, 5:27 pm

Staying with the centre section, sub ribs were added to the flap recesses to support the 1/16” ply liners, which were then glued in place.
Attachments
Sea Fury 126.jpg
Sea Fury 126.jpg (33.54 KiB) Viewed 10299 times
Sea Fury 127.jpg
Sea Fury 127.jpg (20.81 KiB) Viewed 10299 times

David Jones
Posts: 413
Joined: January 24th, 2010, 8:21 pm
Location: Rossendale Lancs
Contact:

Re: 1/4 scale Sea Fury

Postby David Jones » May 18th, 2015, 5:28 pm

The underside of the centre section was sheeted with 2mm Liteply from the rear spar to the trailing edge between the flap recesses. The trailing edge was then sanded to shape.
Attachments
Sea Fury 128.jpg
Sea Fury 128.jpg (36.56 KiB) Viewed 10299 times

David Jones
Posts: 413
Joined: January 24th, 2010, 8:21 pm
Location: Rossendale Lancs
Contact:

Re: 1/4 scale Sea Fury

Postby David Jones » May 18th, 2015, 5:30 pm

The undersides of the outer panels were then fully sheeted, the servo bays cut out and the wing tips added. The tips are made up the same way as the elevator tips. A 1/16” ply core is laminated with 1 /2” soft balsa strips and sanded to shape.
Attachments
Sea Fury 129.jpg
Sea Fury 129.jpg (26.21 KiB) Viewed 10299 times
Sea Fury 130.jpg
Sea Fury 130.jpg (31.28 KiB) Viewed 10299 times

David Jones
Posts: 413
Joined: January 24th, 2010, 8:21 pm
Location: Rossendale Lancs
Contact:

Re: 1/4 scale Sea Fury

Postby David Jones » May 18th, 2015, 5:31 pm

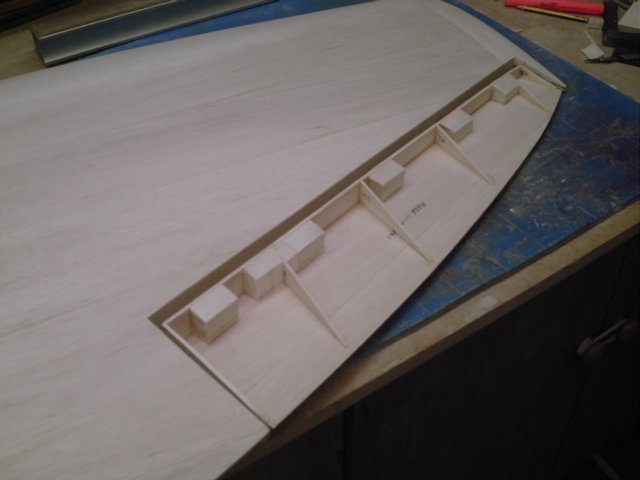
I’d thought about how to hinge the ailerons. The plan shows an elaborate bottom hinge method, using a full length piano wire “hinge” through bushes in each rib. I didn’t fancy this approach, especially on such a large aileron, and I wasn’t sold on top hinging them which, I believe, is more true to scale. I decided to keep things simple and hinge the ailerons along the centre with five large Robart hinges that will locate into full depth hard balsa blocks in both the wing panel and aileron. This meant I had to make up new ribs for the ailerons, the ribs supplied with the kit being discarded.

The aileron bottom sheet supplied with the kit was used. The new ribs were glued in place against a 1/8” balsa false leading edge. The support blocks for the hinges and control horn were also added.
Attachments
Sea Fury 131.jpg
Sea Fury 131.jpg (32.02 KiB) Viewed 10301 times
Sea Fury 132.jpg
Sea Fury 132.jpg (37.49 KiB) Viewed 10301 times

David Jones
Posts: 413
Joined: January 24th, 2010, 8:21 pm
Location: Rossendale Lancs
Contact:

Re: 1/4 scale Sea Fury

Postby David Jones » May 18th, 2015, 5:33 pm

This assembly was then faced off with a 3/8” balsa leading edge. Holes were drilled for the hinges and, once satisfied that all was in line, the top sheeting was added. The leading edge was then sanded to shape and rounded off.
Attachments
Sea Fury 134.jpg
Sea Fury 134.jpg (29.43 KiB) Viewed 10300 times
Sea Fury 135.jpg
Sea Fury 135.jpg (39.99 KiB) Viewed 10300 times

David Jones
Posts: 413
Joined: January 24th, 2010, 8:21 pm
Location: Rossendale Lancs
Contact:

Re: 1/4 scale Sea Fury

Postby David Jones » May 18th, 2015, 5:34 pm

All that remained then was to add the shrouds. These were made up from 1/32” ply strips which were glued into rebates cut into the balsa sheeting. A ply plate will be recessed into the underside of the aileron to act as a hard point for the control horn. All I have to do now is repeat this procedure for the other wing panel.
Attachments
Sea Fury 137.jpg
Sea Fury 137.jpg (31.4 KiB) Viewed 10300 times

David Jones
Posts: 413
Joined: January 24th, 2010, 8:21 pm
Location: Rossendale Lancs
Contact:

Re: 1/4 scale Sea Fury

Postby David Jones » May 22nd, 2015, 3:21 pm

The second aileron has now been made up and the bottom of the centre section has been sheeted with 2mm Liteply between the front and rear spars. The wing was then assembled and the trailing edges were blended in and sanded off to a round edge. The D box of the centre section will be sheeted with 1/8” balsa once the wing fixing dowels have been fitted. Before I do that I want to cut out for the undercarriage. That will be a job for next week.
Attachments
Sea Fury 138.jpg
Sea Fury 138.jpg (36.33 KiB) Viewed 10210 times
Sea Fury 139.jpg
Sea Fury 139.jpg (39.23 KiB) Viewed 10210 times
Sea Fury 140.jpg
Sea Fury 140.jpg (39.56 KiB) Viewed 10210 times

David Jones
Posts: 413
Joined: January 24th, 2010, 8:21 pm
Location: Rossendale Lancs
Contact:

Re: 1/4 scale Sea Fury

Postby David Jones » May 27th, 2015, 9:41 am

The centre section lower sheeting has now been cut out for the wheel wells. Further trimming will be required at the u/c leg mounting points to allow full access to the fixing bolts. This area will then be covered with removable hatches.

I’ve also sheeted the outer parts of the D box and sanded the leading edges to shape to blend in with the outer panels. Next job will be to offer the centre section up to the fuselage to fix in the forward mounting dowels.
Attachments
Sea Fury 141.jpg
Sea Fury 141.jpg (50.41 KiB) Viewed 10126 times
Sea Fury 142.jpg
Sea Fury 142.jpg (46.72 KiB) Viewed 10126 times
Sea Fury 143.jpg
Sea Fury 143.jpg (38.35 KiB) Viewed 10126 times
Sea Fury 144.jpg
Sea Fury 144.jpg (43.03 KiB) Viewed 10126 times

MalcolmDouglasPorter

Re: 1/4 scale Sea Fury

Postby MalcolmDouglasPorter » May 29th, 2015, 10:38 am

Nice stuff Dave. I will need to have a more detailed look through to snatch some ideas?

David Jones
Posts: 413
Joined: January 24th, 2010, 8:21 pm
Location: Rossendale Lancs
Contact:

Re: 1/4 scale Sea Fury

Postby David Jones » May 31st, 2015, 11:08 am

You're more than welcome Malcolm, but I can't take all the credit on this particular project. I've pinched some of Phil Clarke's methods from a previous build (with his permission of course) which he did several years back. Jonesey.

Alan Cantwell 1131
Posts: 1655
Joined: June 15th, 2009, 8:21 pm
Contact:

Re: 1/4 scale Sea Fury

Postby Alan Cantwell 1131 » May 31st, 2015, 8:08 pm

Had hold of all the tailplane, fin and rudder today, lovely work, bit good, is our jonesay :D

David Jones
Posts: 413
Joined: January 24th, 2010, 8:21 pm
Location: Rossendale Lancs
Contact:

Re: 1/4 scale Sea Fury

Postby David Jones » June 4th, 2015, 5:36 pm

The next job was to start to mount the centre section to the fuselage. I’ve replaced the 3/8” wooden dowel pegs with 12mm aluminium tubing. This should be stronger and more durable. It was tack glued in place and the wing was offered up to the fuselage, once satisfied that all was aligned, the “dowels” were fixed in situ and supported by 1/2” square hardwood bearers top and bottom.
Attachments
Sea Fury 145.jpg
Sea Fury 145.jpg (44.2 KiB) Viewed 9862 times
Sea Fury 146.jpg
Sea Fury 146.jpg (34.7 KiB) Viewed 9862 times

David Jones
Posts: 413
Joined: January 24th, 2010, 8:21 pm
Location: Rossendale Lancs
Contact:

Re: 1/4 scale Sea Fury

Postby David Jones » June 4th, 2015, 5:38 pm

Now that the leading edge dowels were fixed, I could finish sheeting the D box. Before gluing the sheeting on, I made up dummy radiator grills for the carburettor and oil cooler intakes. These were simply made from aluminium mesh glued to 1/32” ply painted matt black, and then glued to the inner balsa spars.
Attachments
Sea Fury 147.jpg
Sea Fury 147.jpg (42.08 KiB) Viewed 9862 times
Sea Fury 148.jpg
Sea Fury 148.jpg (43.25 KiB) Viewed 9862 times


Return to “Your New Projects”

Who is online

Users browsing this forum: No registered users and 11 guests